Comments Service Features
Deployment and support
- No need to authenticate to leave a comment
- Lightweight, script-based integration
- Dedicated on-line support
User features
- Threaded or flat comments
- Comment sorting and ordering by date, name, karma
- Native avatars support
- Rich Text formatting (HTML and WYSIWYG modes)
- Straightforward embedding of YouTube videos
- Delete your comments
- Receive comments and reply straight to thread via email
- Community scoring or Karma (i.e. "Like this comment? [yes] [no]" thing)
- Automatic community moderation (i.e. "Mark as offensive" tool)
- TrackBack and PingBack support
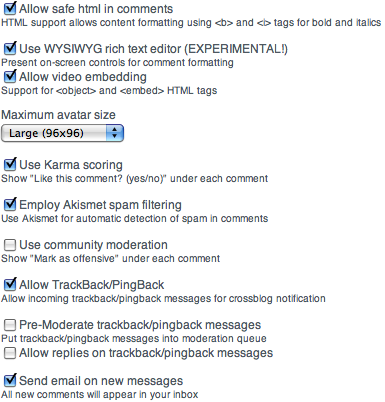
Customization and Administration
- Fully customizable with CSS
- Customizable fields and layout with templates
- Customizable presentation (i.e., full in-line, pagination)
- Integrated, object-level 5-Star Ratings (Also available as "Reviews" with greater integration)
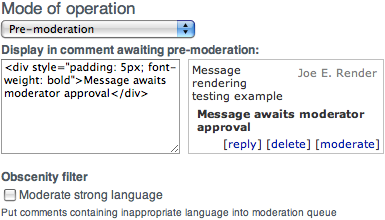
- Pre-moderation: all comments pre-moderated or only comments from new users
- Post-moderation: blocking by multiple IPs, name, etc.
- Global (single point) or "inline" moderation
- Multi-moderator support for configurable subsections of the site
- Obscenity filter (admin-defined)
Security, Authentication and Data Access
- Automatic SPAM protection via Akismet
- OpenID or cookie-based authentication
- Publisher control of comment data (RSS, export example)
- Ability to switch CMS platforms without losing comments
- Automatic import of Blogger and WordPress comments
- Safe HTML subset support
- Automatic browser detected language support for English, Japanese, French, Spanish, German and a dozen more
Customizing Comments
| 1. | Using a <DIV> tag to place comments |
You can deploy the comments in a place separate from the <SCRIPT> tag
by using the <DIV> with class="js-kit-comments". Place the <SCRIPT>
tag at the very end of the HTML page to speed up page load.
<div class="js-kit-comments"></div> ... rest of html code ... <script src="https://js-kit.com/comments.js"></script> |
|---|---|---|
| 2. | Changing the "Leave a comment" text |
You can override the default
"Leave a comment"
message by using the label attribute:
<div class="js-kit-comments" label="Comment this photo"></div> <script src="https://js-kit.com/comments.js"></script> |
| 3. | Same comments on different pages |
If the document is accessible using multiple alternative path names and
you want to display the same comments everywhere, use path specification:
<div class="js-kit-comments" path="/my/fixed/path"></div> <script src="https://js-kit.com/comments.js"></script> You may also omit the leading slash. |
| 4. | Multiple comment widgets on one page |
You can have multiple comment blocks on the same page.
Use unique path value for each comment block:
<div class="js-kit-comments" path="blogEntry1"></div> ... <div class="js-kit-comments" path="blogEntry2"></div> ... <div class="js-kit-comments" path="blogEntry3"></div> ... <script src="https://js-kit.com/comments.js"></script> |
| 5. | Pagination of comments |
You can break long lists of comments into multiple pages
using the paginate="N" attribute, where N is the number of comments per page.
<div class="js-kit-comments" paginate="10"></div> <script src="https://js-kit.com/comments.js"></script> |
| 6. | Reverting the order of comments |
You can use the backwards="yes" attribute to make the comments on a page appear in reverse chronological order. This attribute also places the comments controls at the top of the comments box.
<div class="js-kit-comments" backwards="yes"></div> <script src="https://js-kit.com/comments.js"></script> |
| 7. | Using CSS to style |
You can change the comments' look by using CSS after the <SCRIPT> tag:
<script src="https://js-kit.com/comments.js"></script> <style type="text/css"> Your style here </style> |
| 8. | Customization templates |
You can completely change the comment entry design by using templates:
<div class="js-kit-comments" style="display: none">
<!-- Template for a single comment entry. This template is optional -->
<!-- Template for a "Create a comment" dialog. This template is optional --> |
| 9. | Adding custom input fields | Using templates, you can add any number of custom fields to the comment! |
| 10. | Setting up the RSS |
All comments are accessible via RSS using the following URL:
https://js-kit.com/rss/your.site.com/path
where path is either a valid permalink or a valid path attribute value. Alternatively, you can setup a DNS entry:
js-kit.your.site.com. IN CNAME js-kit.com.
or
rss.your.site.com. IN CNAME js-kit.com.
and access it as:
https://rss.your.site.com/path
|
| 11. | Integrating with the Ratings widget | See how your Comments widget can integrate with the Ratings widget to bring the power of Reviews. |
| 12. | Overriding widget behavior |
Some types of customization require intervention into widget internal logic. For example, sometimes it is necessary to override comment threading behavior by providing different nesting offsets. Insert the following code somewhere before the <SCRIPT> tag which invokes the widget:
<script> JSKit$Override = [ ["level2margin", function(level) { if(level < 20) return "20px"; if(level > 40) return "4px"; return "0px"; } ] ]; </script> |
| 13. | Use a permanent URL for each object |
Use a permanent URL for each object (blog post,article,etc).
<div class="js-kit-comments" permalink="https://mysite.com/permanent/link/to/page.html"></div> <script src="https://js-kit.com/comments.js"></script> |