Customizing Polls
The best part about customizing polls is that you can do it with your mouse right in the web browser.
- Install the widget by copying the HTML code from the box above into the web page template. You may use your favorite web editor (Dreamweaver, Frontpage, vi).
- Publish the page on the web.
- Direct your browser to that web page. The page must have a readable domain name (numeric IPs or file:// URLs are not supported).
At this point, you will see the poll customization options (Figure 1).
While being customized, the poll your web page is visible only to you, the web site administrator. Your users won't ever notice that you are still configuring the poll.
Once you are done configuring the poll, click "Create poll". Your users will immediately see the poll and will be able to vote on it. You will, too.
If you subsequently need to create a different poll, follow the [reconfigure] link which will be available to you at any time. There is no limit on the number of times you can reconfigure the poll. You won't have to edit that HTML for poll-related reasons, ever.
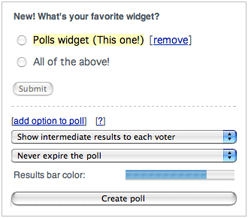
Figure 1. Editing the poll
<div class="js-kit-poll" path="/poll2"></div>
<script src="https://js-kit.com/polls.js"></script>